
 Games
Games Game Series
 Guide
Guide
 简体中文
简体中文 हिन्दी
 한국어
한국어 Tiếng Việt
 ไทย
ไทยIf you are a fan of retro gaming, you already know the struggle. Revisiting classic titles on modern Windows 10 or Windows 11 operating systems often feels like a gamble. You might be eager to dive back into a nostalgic Visual Novel or a complex Tactical RPG, only to be met with severe FPS drops, unplayable stuttering, visual glitches, or a game that simply crashes the moment you launch it.
These issues arise because modern graphics cards and operating systems no longer natively support the older legacy rendering APIs (like DirectX 9 or earlier) that these classic games were built upon.
This is where dgVoodoo 2 comes in as an absolute lifesaver. dgVoodoo 2 is a powerful graphics wrapper that acts as a translator between your old games and your new hardware. It takes the outdated graphics commands (DirectX 1-9 or 3Dfx Glide) and converts them into modern DirectX 11/12 or Direct3D 12 APIs. By doing this, it forces the game to recognize and utilize your modern GPU, eliminating compatibility errors and restoring performance to buttery-smooth levels.
Below is our comprehensive, A-Z guide on how to install and configure dgVoodoo 2 for the best possible experience. Let’s begin with acquiring the correct files safely.
Preparation and Downloading
Follow the two simple steps below to download the software to your computer:
- Step 1: Visit the official website of the developer, Dege, and navigate to the dgVoodoo 2 section to download the latest version. You can access the direct repository here: https://dege.freeweb.hu/dgVoodoo2/dgVoodoo2/
- Step 2: Extract the downloaded ZIP file to a temporary location. You will see several folders and configuration files inside. Don’t worry about the clutter; we only need to focus on a few core files to get your games running perfectly.
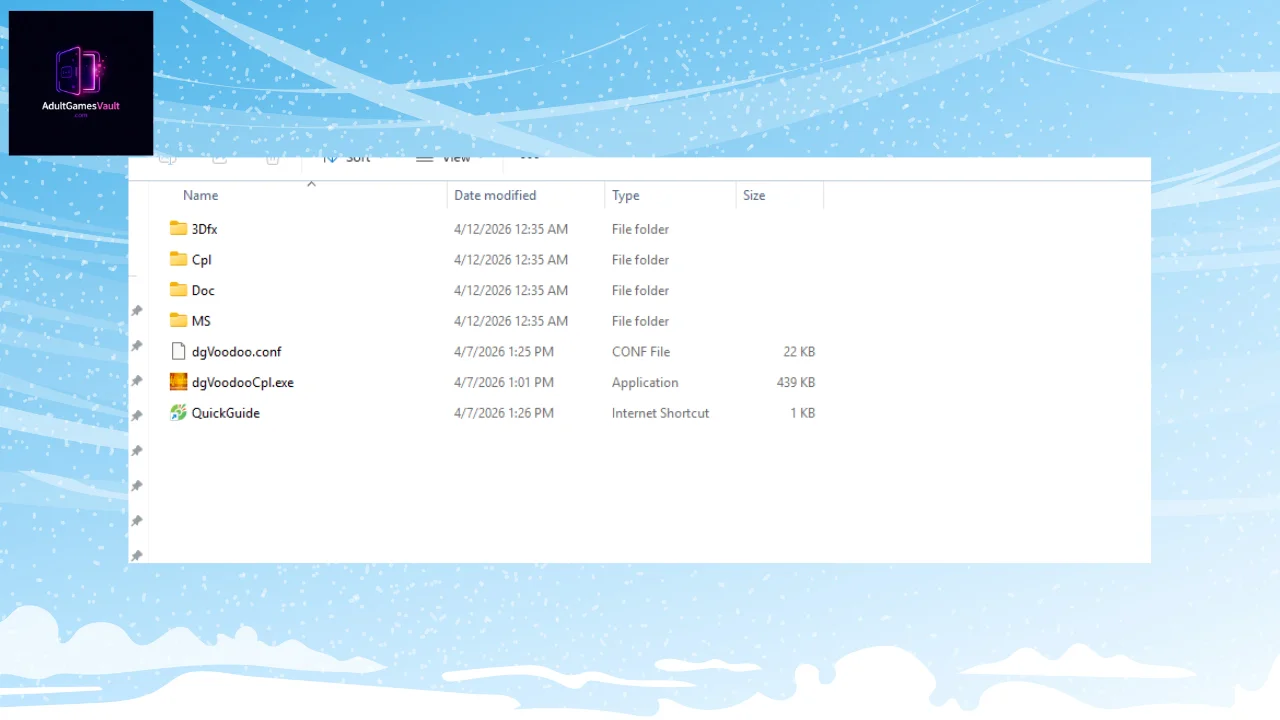
With the files downloaded and extracted, you are now ready to inject them into your game folder.
Detailed Installation Steps
The core principle of using dgVoodoo is placing the necessary wrapper files directly into the game’s root directory. (Important Pre-Installation Note: Always check your game directory first to see what files are already present before pasting anything in).
First, we need to handle the control panel and configuration settings.
Step 1: Copy the Configuration Files
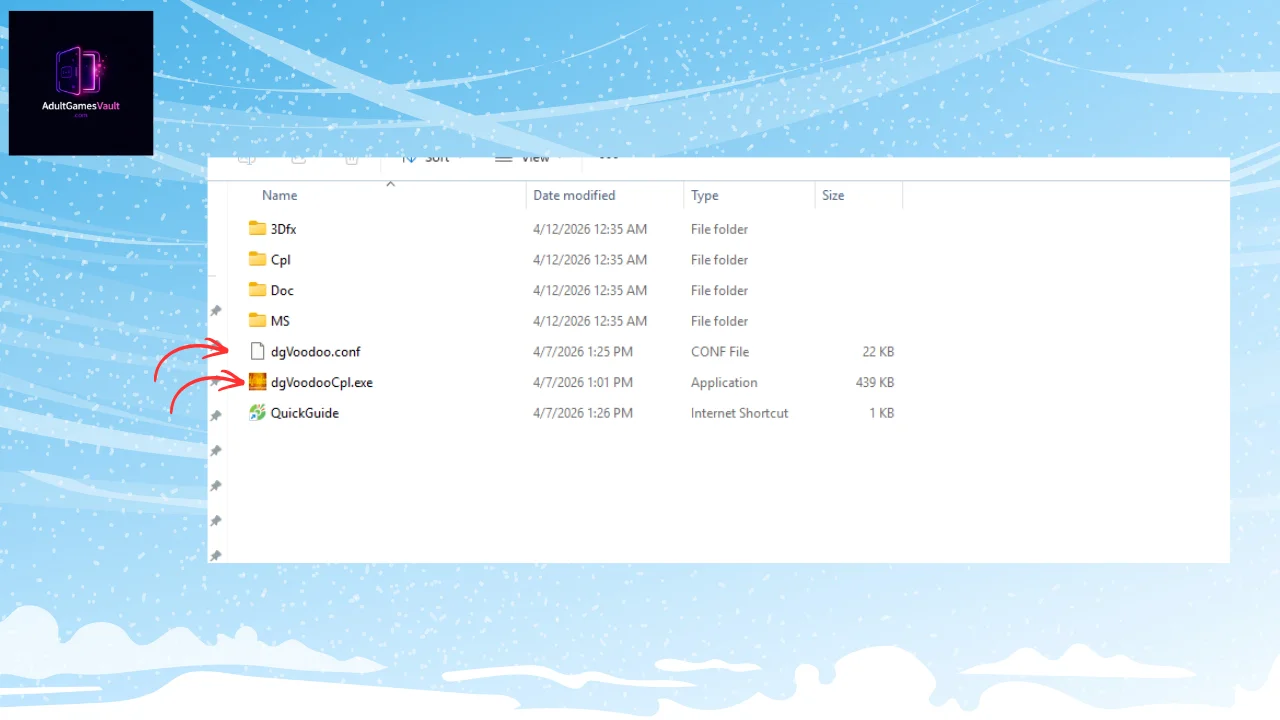
From your extracted dgVoodoo folder, copy two specific files: dgVoodooCpl.exe (The Control Panel application) and dgVoodoo.conf (The Configuration File). Paste them directly into the root folder containing your game’s main .exe executable.
Next comes the most critical part: adding the proper DirectX libraries.
Step 2: Copy the DLL Libraries (Crucial)
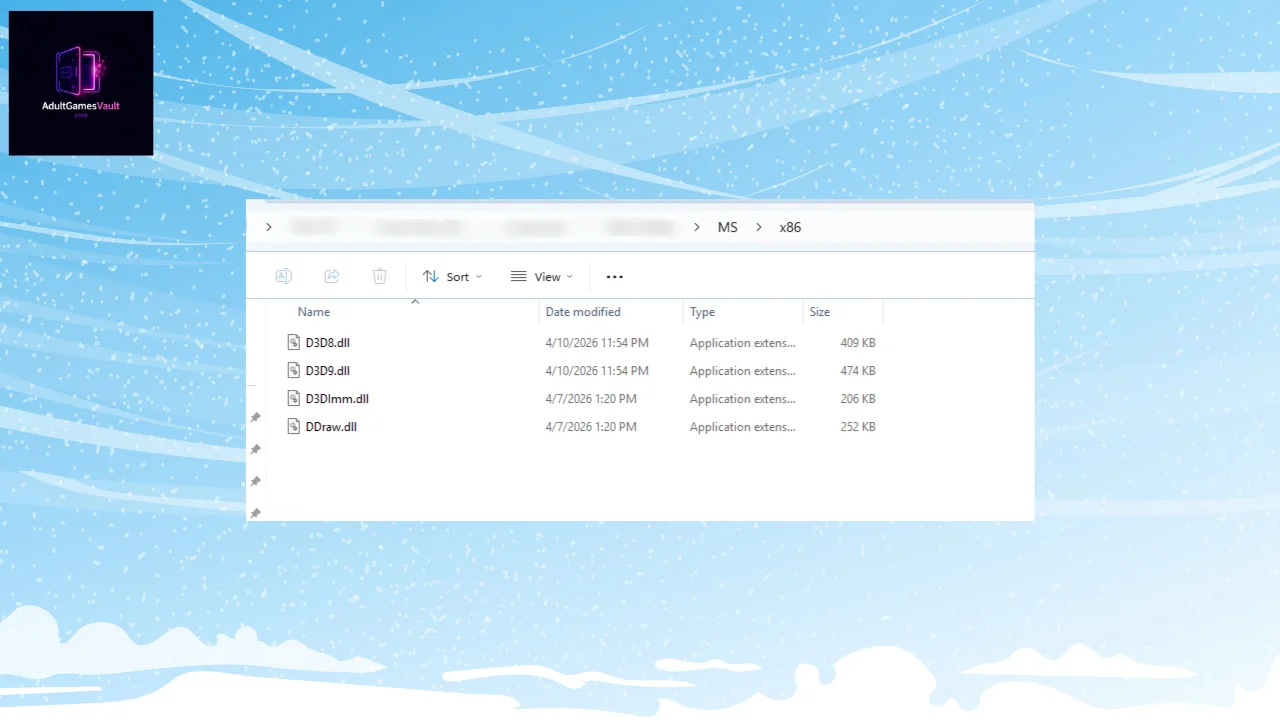
Most classic games on the market (especially native 32-bit games) run on the Microsoft DirectX platform. Therefore, inside the extracted dgVoodoo folder, navigate to the MS folder, and then open the x86 folder.
Copy all the .dll files inside this directory (which includes d3d8.dll, d3d9.dll, D3DImm.dll, and DDraw.dll) and paste them into your game’s directory alongside the .exe file.
Crucial Note for Modded Games: If your game directory already contains a custom d3d9.dll file—which is highly common in games like School Mate 2 that utilize fan translations, uncensor patches, or subtitle mods—you must rename the dgVoodoo file to d3d9_alt.dll before pasting it. This prevents dgVoodoo from overwriting the game’s original mod file, allowing both the translation mod and the graphics wrapper to run simultaneously.
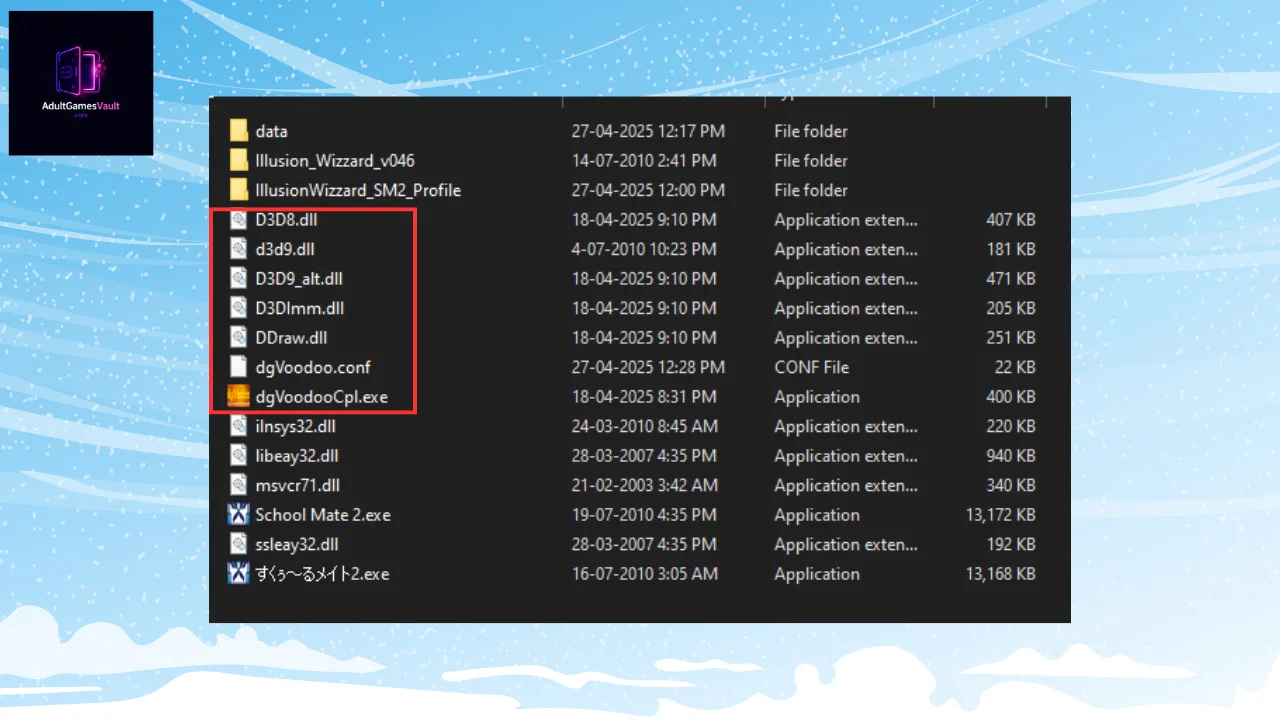
(Alternative Note: If your specific game was released during the era of older 3Dfx Voodoo cards, you will need to copy the library files from the 3Dfx folder instead of the MS folder).
Simply placing the files is only half the battle; configuring them properly is what unlocks true performance.
Optimal Configuration Settings
Once the files are copied, run the dgVoodooCpl.exe file located right inside your game folder. To optimize visuals and performance—especially when the game needs to load a massive amount of high-resolution character sprites or process dense tactical combat effects—you need to tweak a few settings.
First, we will adjust how the game renders on your display.
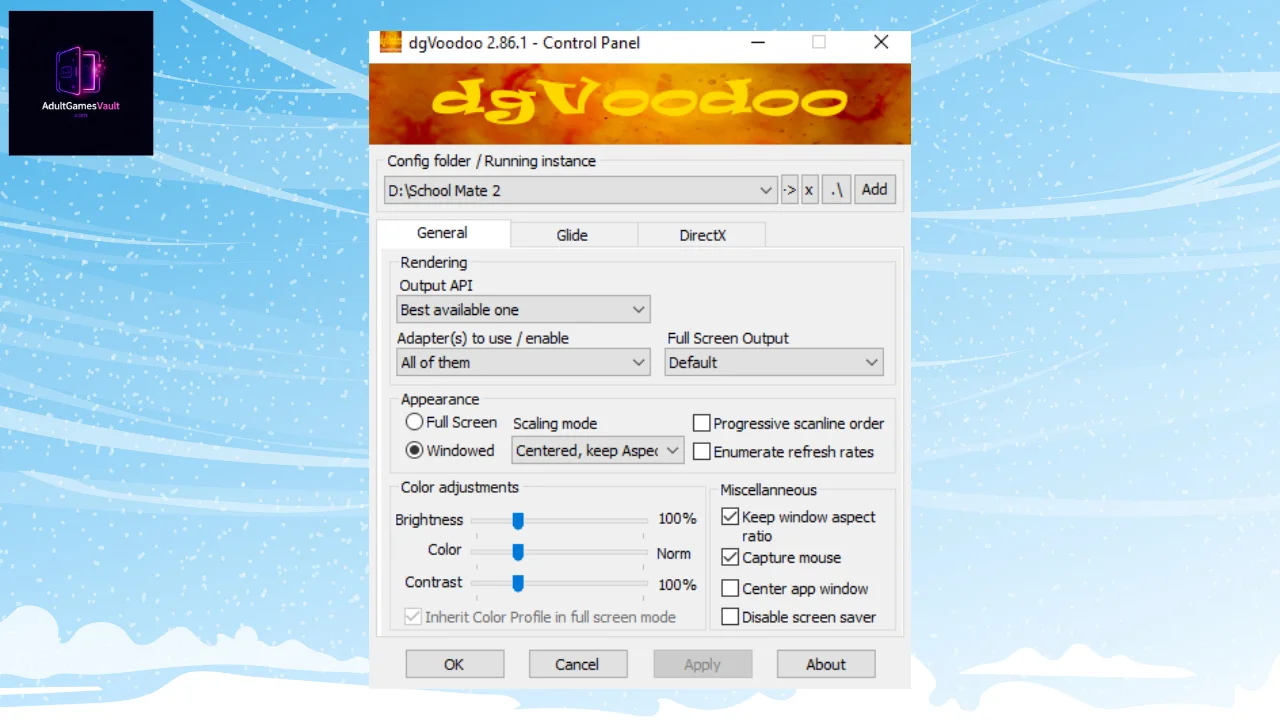
In the General Tab:
- Appearance: Choose Full Screen if you want to play in a traditional fullscreen mode, or Windowed if you prefer a scalable window on your desktop.
- Scaling Mode: It is highly recommended to select Stretched, keep Aspect Ratio. This option scales the game to cleanly fit your modern monitor while maintaining the original aspect ratio, preventing characters and UI elements from looking unnaturally stretched or distorted.
Next, we will boost the graphical processing power allocated to the game engine.
In the DirectX Tab (Performance Enhancers):
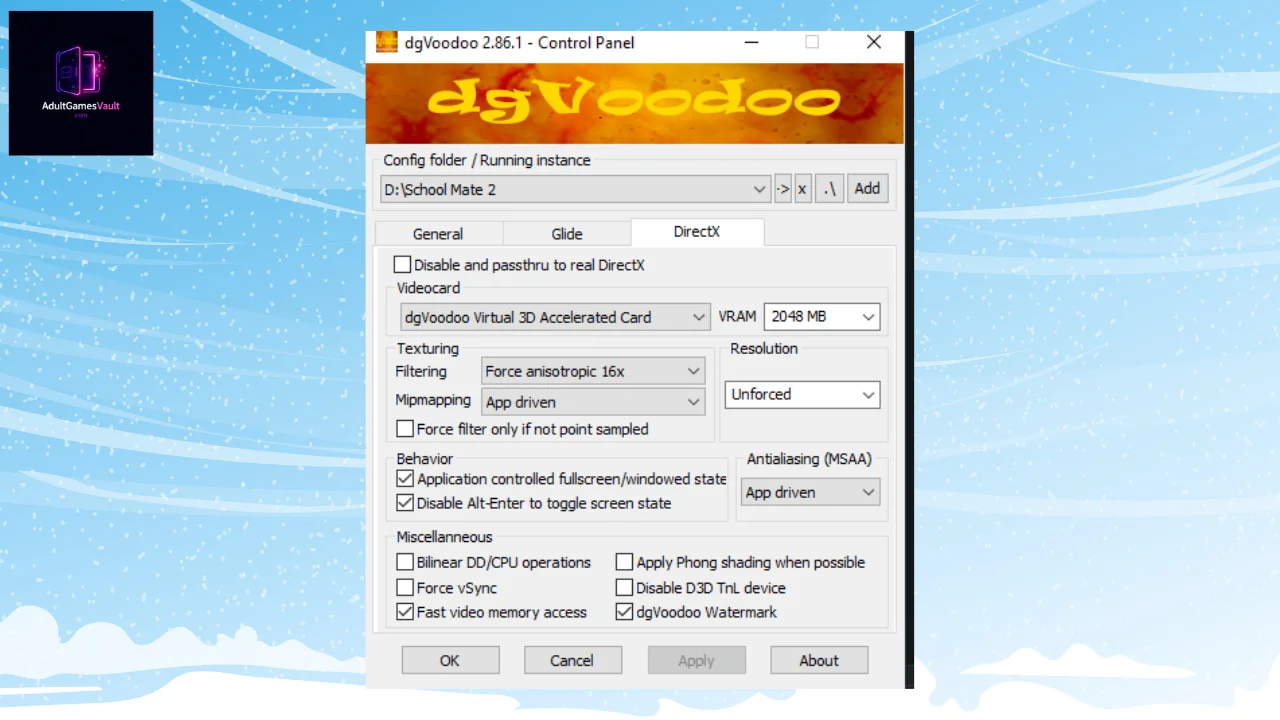
- VRAM: By default, older games recognize a very low amount of Video RAM. Increase this VRAM setting to 1024 MB or higher. This leverages the sheer power of your modern GPU and completely eliminates micro-stutters during heavy scenes.
- Resolution: You can leave this at Unforced (keeping the game’s native resolution) or force it to 1920×1080 / 4K for significantly sharper imagery. (Note: If forcing a higher resolution causes your in-game mouse cursor to become misaligned with the UI, revert this setting back to Unforced).
- Filtering: Set this to Force Anisotropic 16x to dramatically sharpen surface textures in 3D titles.
- Miscellaneous: Make sure to Uncheck the dgVoodoo Watermark box. This removes the software’s faint copyright logo from the bottom corner of your screen while playing.
Pro-Tip: Feel free to experiment with these settings! Every legacy game engine behaves differently, so a little trial and error might be required to find the absolute perfect configuration that suits your specific setup.
Wrapping things up, this software is truly a necessity for video game preservation.
Conclusion
Don’t let modern hardware limitations keep you from enjoying the classics. While continuous Windows updates may have broken the native compatibility of older DirectX titles, tools like dgVoodoo 2 ensure that gaming history is preserved and remains fully playable today.
By taking just a few minutes to copy over the right files and adjust the VRAM settings, you can completely transform a stuttering, unplayable mess into a smooth, high-resolution experience. Follow the steps above, apply your custom settings, and get ready to dive back into your favorite retro worlds without compromise!